Showing posts with label upcycling. Show all posts

Saturday, October 4, 2014

Easy Toddler Dress Tshirt Upcycle

This is one of the easiest toddler dresses to make! Minimal cutting, two seams, and a little bit of threading and you have a roomy and comfortable dress for your little one! Could also be used to make tank tops for adults as well.
 
You'll need a rotary cutter, ruler, cutting mat, thread, pins, and a tshirt.
 
 
 If your tshirt has sleeves, start by cutting them off, leaving the arm seam intact. Then, right at the ribbed neckline, cut all the way across the top of the tee.
 
 
Fold down the top edge of the front towards the inside and pin. I did about a 1/2 inch fold. Repeat for the back.
 
 
Sew along the fold lines both front and back creating two long pockets.
 
 
For the straps, cut off the ribbed neckline into one long strip.
 
 
Using a safety pin attached to one end thread the strip through the pockets at front and back. Do a fit on your little one to check the fit of the neckline and then cut off the excess and sew the two ends together.
 
 
And you're all set! Super easy and cute! These have been really useful and stylish for us this summer and because they're so roomy they can be used again next year! Plus, if the straps ever get too tight they can always be replaced with longer strips! And they will eventually be great tank tops for your girl! ;)


Friday, May 23, 2014

Toddler Tshirt Dress Upcycle

Sorry for the hiatus, but I've been swamped making my products for our local Farmer's Market. The market is in full swing and the beautiful weather is contributing to some great days!
 
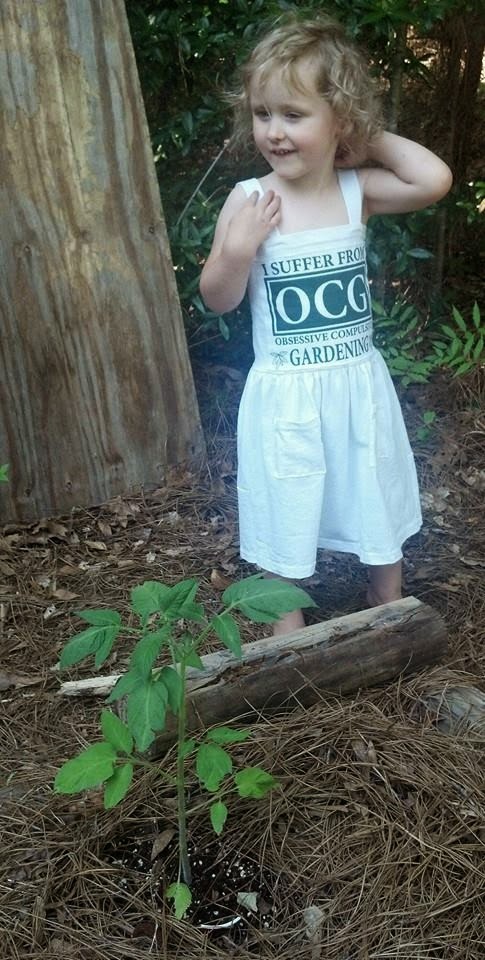
I've of course been doing a few projects for myself and my family too, but none of them were especially noteworthy until now. Yesterday, my mom gave me a white adult tee that had the best graphic on the front, hoping that I could alter it for Nia's use.

 
As you can see, I couldn't pass this up. Normally I'm not big on white fabric in general since we're fairly messy people, but I figured that stains would actually contribute to this outfit, so I went for it!
 
(Measurements are approximate and should fit a 3T. All seams are 1/4 inch unless otherwise specified.)
 
I decided to cut out the part of the graphic that I wanted since it was also an advertisement for a local garden supply company. I cut off the sleeves and up both sides so that I could work with the front and back independently. Once I cut out the graphic that would be my centerpiece, I then cut a strip from the bottom of the same side (including the hem) that was 8 inches tall. This was just big enough to fit my graphic piece, which I then appliqued in the center after turning it upside down so that the hem was now at the top. (By the way, in this case, I just stitched an 1/8 inch from the edges all the way around and left the edge raw, just to add some interest.) And with right sides together I stitched up the back seam. Now I had a tube.
 
 
For the skirt I took the front of the shirt and measured up about 13 inches from the bottom, once again including the hem. So, this piece was 13 inches tall x the width of the shirt (which was an adult large I think). This would be the front part of the skirt.
For the back, I didn't have a large enough piece left to match the front, so I cut the two sleeves at the seam, pieced them together, cut the top even, and then added another strip tall enough to match the skirt front.
 
 
Right sides together, I stitched the side seams to combine the front and back pieces of the skirt. Now I had another tube.
I did a basting stitch around the top of the skirt so that I could gather it to fit to my bodice (right sides together). Lots of gathering and pins later, I stitched the bodice and skirt using a narrow zigzag to give it some stretch.
 
With the remainder of the sleeve material (with hems attached) I cut two pockets (about 3x3) and appliqued them to the front of the skirt.
 
 
Finally, with the last of the large scrap pieces, I cut two strips that were 2x8 inches and stitched a seam down the length with wrong sides together, leaving the edges raw. I then placed these evenly at the front and back of the top, stitching along the existing "hem" stitch line to make my straps.
 
 
Now, time to get it stained!


Tuesday, April 1, 2014

Women's Shirt to Toddler Dress Refashion

So, my mom recently gave me this really pretty Indian cotton shirt. Unfortunately it wasn't especially flattering for her and was on the thin side, but she thought it might make a good dress for Nia. I grabbed an adult XL tee the same shade of pink for the lining and I was ready to start cutting!
 
 
Using another dress I had made as a guide, I cut out my pieces from both shirts, leaving the bottom hems intact. I also cut the main shirt so that the bottom two buttons of the original placket would now be fastenings in the back of the new dress.
 
 
I stitched up the side and shoulder seams on each of the lining and outer dresses and then attached them at the neck with the wrong side of the lining facing the right side of the outer dress. This was so that when I turned the outer dress rightside out, the inner dress would also be rightside out since the bottom hem showed in a side slit.
 
 
After turning, I topstitched the neckline with embroidery thread (3 strands) and secured the two pieces at the top of the button placket in the back after cutting a matching slit in the tee lining. (I didn't worry about binding off the edge of this slit since jersey doesn't fray.)
 
 
 I decided to add some ruffled cap sleeves out of the outer material, so I cut pieces from the bottom edges of the sleeves (once again, keeping the original hems). After gathering, I basted the sleeves in place as well as the entire arm opening. Then, I whipstitched the rough edge of the opening and turned it under 1/4 inch. Finally, I topstitched the armholes with embroidery thread just like the neckline.


This one turned out so pretty! I think it's a keeper!


Wednesday, March 12, 2014

Men's Button-down Shirt to Toddler Dress

I did this project a few weeks back, but the weather has been so contradictory since then that I haven't had the chance to do a photo shoot. But, we've finally had some pretty days around here, so here goes! (Sorry in advance for the lack of decent pictures. I didn't take proper photos as I was working.)
 
The Men's Shirt to Toddler Dress. Who doesn't have a few men's button-down shirts laying around just waiting for a project? Personally I've got quite a few due to random rips or stains that relegated them to the scrap bin. And I've got a daughter growing taller every day with spring coming on, so time for some new dresses!
There are lots of great tutorials out there for these and many different variations. Due to the nature of the yellow linen shirt I was working with mine had to be modified to fit around some rips, but seeing as there's so much fabric to be had in an XL men's shirt, I had no problem making it work.

 
For the main body of the dress I cut off the bottom half of the shirt and gathered it. Since I wanted to use the buttons in the final design in the back of the dress, I also cut a piece from the upper half of the shirt the width of the bodice (chest measurement divided by 2 plus an inch or so for seams and ease of movement).


I sewed the front and back pieces together at the sides and attached the gathered skirt. One more folded strip of fabric provided a top hem for the bodice. And two wide strips of fabric were folded and sewn up the long half, turned right side out, and attached at the top for straps.
My girl loves pockets and it seemed a shame to let the one on the original shirt go to waste, so I removed it from the remaining shirt and stitched it in place at the front of the skirt.
 
 
I think it's a hit!
 

Monday, February 24, 2014

Three Tee Refashions

I don't know about you, but I have a hard time finding tees that look formal enough for work, but also are flattering. I'm very picky about sleeves and necklines. My mom gave me a few really nice heavyweight and extremely soft tees, but the sleeves were really short and that is just not a good look on me. Plus, the neckline was your basic crew type. So, for my first attempt at altering these I just redid the sleeves. (Oh, and put a fun graphic on it, courtesy of Pointless T-shirt Designs). After using my seam ripper to remove the original sleeves, I laid them out on another black tee I had, leaving a few extra inches at the outside hemline and adding some fullness to the shape. Then I cut out my new sleeves utilizing the original shoulder line and the hemline on the scrap shirt. (Wish I had a picture of this, but it was a while ago.) Stitched them on and used the hems to put in my elastic for a gathered sleeve. Pretty basic. And here's the finished product. (Sorry in advance for the tipsy aspect of these pics and the wrinkliness of the shirts!)
 
 
So, for the next shirt I decided to change the neckline as well and put on a little embellishment. For this one I made the new sleeves the same way except that I made them elbow-length straight sleeves. Then I cut down the neckline. Taking a two-inch wide strip of fabric I folded it together and pinned it to the wrong side of the neckline, making sure to overlap my seam at the back of the neck. A stretch stitch to secure it in place and a topstitch to hold its' shape and the neckline was finished. As far as embellishment went I wanted something fairly simple, so I cut out a couple of feathers and stitched them on with contrasting thread. After a wash the edges rolled up nicely and gave it a ragged effect.


For the third shirt, I decided to redo the same neckline as the second, but wanted to change up the sleeves and embellishment again. This time I went for an elbow-length bell shape. And found a great tutorial on Pinterest for some cute flowers. Each flower involves 6 equal circles that are then folded into thirds and stitched into a circle. The stitches make a nice effect on the inside of the flower. I'm really happy with how this last one turned out. The flowers will curl up more with each washing!


 Lots more to come, so stay tuned!