Showing posts with label garden. Show all posts

Monday, August 4, 2014

Quiet Book Finished!

Now that the trip is over I finally have time to tell you about the rest of the quiet book, as well as its success on the trip!
 
So, I ended up with 12 pages all together, so I've got four new ones to show you.
 
First up was the orchard with fruit to count and a basket for...
 
The garden's crops! Tomatoes, beets, and carrots. Yum!
 
Then I added the frog with his zipper mouth and long tongue that snaps onto the flies surrounding him. :)
 
And, finally, I added the weather page with clouds full of rain and rainbows, covering a sunny mirror.
 
These all came out so well. I was really feeling it by this point!
 
So, here's the final layout of all of the pages.
 
Now that they were finally done, I sewed two pages together, right sides facing, and then turned them inside out, finishing off with a top stitch. Each set of pages also had three ribbon loops attached to the side for gathering together in the cover.
 
 
The cover was one long piece with holes in the middle for binder rings to hold all of the pages together. And it all buckled together at the front with a ribbon.
 

I even added a pocket at the back for any miscellaneous bits.
 
And boy, was it a success! She's had so much fun playing with it! Even uses her tools from her overall page to "dig" in the garden. Too cute!
Granted, it took a ridiculous amount of time to make since a lot of it ended up being hand sewn, but it was totally worth it. We're gonna keep this one for a long time and I've already got more pages planned! ;)


Tuesday, July 8, 2014

Quiet Book Immersion!

Oh my goodness! I am so unbelievably involved in the world of quiet books at this moment that I don't even know what to do with myself! I started making one in a desperate attempt to keep Nia occupied during a 13-hour road trip at the end of this month. However, now that I've started, I can't stop!
 
Of the 13 pages I have planned so far, I've gotten 8 done! And, for my garden loving girl, they are all garden/farm themed. Here's what I've got so far:
 
 
You can't garden without the right outfit and tools, right?


Gotta tend those flowers!
 
 
The hen's eggs are hatching! Get the chicks under her wing! (This one is a favorite for my baby obsessed girl.)


I loved this idea for a barn with finger puppet animals inside and had to make a field for the animals to play in.
 
I think this pond is one of my favorites so far. Nia loves turtles and counting to 5.


And it wasn't complete without a field of flowers for a bee to harvest!
 
I've still got a garden gate/orchard scene, crop field, frog catching flies, weather, and wheel of the year planned, as well as putting it all together with a cover. But I've still got a couple of weeks to go. Wish me luck!


Friday, May 23, 2014

Toddler Tshirt Dress Upcycle

Sorry for the hiatus, but I've been swamped making my products for our local Farmer's Market. The market is in full swing and the beautiful weather is contributing to some great days!
 
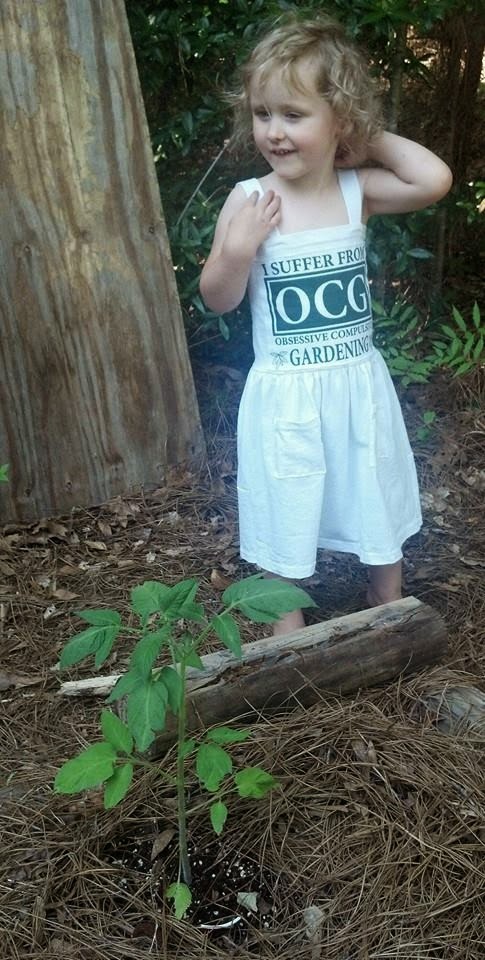
I've of course been doing a few projects for myself and my family too, but none of them were especially noteworthy until now. Yesterday, my mom gave me a white adult tee that had the best graphic on the front, hoping that I could alter it for Nia's use.

 
As you can see, I couldn't pass this up. Normally I'm not big on white fabric in general since we're fairly messy people, but I figured that stains would actually contribute to this outfit, so I went for it!
 
(Measurements are approximate and should fit a 3T. All seams are 1/4 inch unless otherwise specified.)
 
I decided to cut out the part of the graphic that I wanted since it was also an advertisement for a local garden supply company. I cut off the sleeves and up both sides so that I could work with the front and back independently. Once I cut out the graphic that would be my centerpiece, I then cut a strip from the bottom of the same side (including the hem) that was 8 inches tall. This was just big enough to fit my graphic piece, which I then appliqued in the center after turning it upside down so that the hem was now at the top. (By the way, in this case, I just stitched an 1/8 inch from the edges all the way around and left the edge raw, just to add some interest.) And with right sides together I stitched up the back seam. Now I had a tube.
 
 
For the skirt I took the front of the shirt and measured up about 13 inches from the bottom, once again including the hem. So, this piece was 13 inches tall x the width of the shirt (which was an adult large I think). This would be the front part of the skirt.
For the back, I didn't have a large enough piece left to match the front, so I cut the two sleeves at the seam, pieced them together, cut the top even, and then added another strip tall enough to match the skirt front.
 
 
Right sides together, I stitched the side seams to combine the front and back pieces of the skirt. Now I had another tube.
I did a basting stitch around the top of the skirt so that I could gather it to fit to my bodice (right sides together). Lots of gathering and pins later, I stitched the bodice and skirt using a narrow zigzag to give it some stretch.
 
With the remainder of the sleeve material (with hems attached) I cut two pockets (about 3x3) and appliqued them to the front of the skirt.
 
 
Finally, with the last of the large scrap pieces, I cut two strips that were 2x8 inches and stitched a seam down the length with wrong sides together, leaving the edges raw. I then placed these evenly at the front and back of the top, stitching along the existing "hem" stitch line to make my straps.
 
 
Now, time to get it stained!